
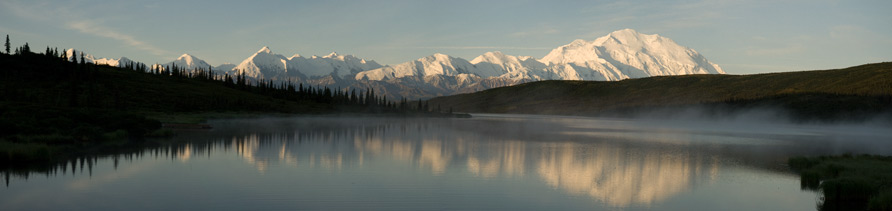
Article - Taking Panoramic images with a Digital SLR (Horizontal example)
- Do the math. Calculate based on your target output device. If it's an inkjet printer, think in terms of 240-360 DPI (Dots Per Inch). Thus, if you want a 13 inch x 40 inch image at 300DPI, your processed file will have to contain 3,900 pixels by 12,000 pixels. If you are doing a landscape shot, consider rotating the camera 90 degrees in "Portrait" mode to achieve more vertical pixels as you shoot for example, from left to right.
- Use a tripod, and as much as possible, level perfectly. This is particularly important for architecture (with many straight lines), and a bit less so for landscape.
- Target a 20% - 25% percent image overlap. This gives photo stitching software overlapping material to work with. If your camera screen has it, use its grid to help reference this overlap. If your tripod has degree markings, pre-calculate how many degrees rotation equates to about 75% of the image content. That way, when you start taking your shots, you can quickly turn the tripod a set number of degrees and trigger the shutter.
- Set everything on your camera to manual. In particular, set focus, aperture, shutter speed, ISO, and color termperature to manual. Disable any other settings such as sharpening or 'automatic contrast'. Consider shooting in RAW mode so that you have more post-processing options. If you shoot in RAW mode instead of JPG, you must keep the color temperature (and generally all other RAW conversion options) constant as you process your images from RAW to JPG.
- Generally, I would recommend removing any filters, including simple UV clear filters. I've tried panoramic shots with a graduated density filter, but found it made abrupt tonal transitions (in particular, the sky). This can be overcome under certain circumstances, but unless a filter is absolutely required, I would recommend its removal..
- If you do not have a specialized tripod that rotates the camera around the lenses nodal point, avoid shooting images that have nearby foreground content - that is, insure the closest object isn't too close (I don't have an exact answer for you on this). I found that using a standard tripod works fine when shooting objects at a distance and the panorama above was successfully stitched using a lens in the 70mm range.
- Scan the entire region and examine your camera's metering. Meter the scene in the brightest part of the image. Set your exposure accordingly. If there is a large range from bright to dark, try to keep your highlights just below blowing them out into a solid white.
- Be aware that if your subject has movement between shots, stitching may be problematic. The above panorama taken in Kauai concerned me due to the ocean waves moving, but the overlap I used was sufficient for the stitching software to overcome the fact that the wave moved slightly from one image to the next. The waves were sufficiently distant from my camera such that their movement was relatively 'small' in the overall image.
- Scan your proposed panorama from left to right, insuring the tallest object and the lowest relevant object all fit comfortably within your desired composition. Provide additional headroom as when you assemble the image on your computer, you may have to crop a bit from the top and bottom of the overall image.
- When calculating the number of desired pixels, remember to include lost horizontal content due to the 20% - 25% image overlap tip above, and also plan on losing perhaps 10% from the bottom and from the top of your original shots during the stitching process.
- For stitching, there are numerous programs out there. I am enjoying Photoshop CS3 (in beta at the time of its writing) as it adds greater capability then its predecessor Photoshop CS2. I have not tried other products, but I am aware of http://www.ptgui.com/.
Any comments are always welcome, feel free to e-mail me at:
![]()